Thursday 28 February 2008

Brown paper packages tied up with string

Or in this case with ribbon! I love to get creative with gift wrapping, and that coupled with my tendency to hold on to every usable piece of paper that comes into the house often leads to the wrapping being a project in itself!

Here's a recent gift for my friend Lucy.

I used a brown lunch paper sack and tied it up with sheer ribbon, tucking a silk flower in as I tied the ribbon.

Today is our anniversary and this is the package for Lucas.
I used some brown paper that cames in packaging material in a scrapbook kit, and stamped randomly over it, before folding it up and tying with ribbon. I made the tag by stamping on white cardstock and then matting with some patterned paper. All stamps are by Alpha Stamps and the patterned paper is 7 Gypsies

Wednesday 27 February 2008

Masculine birthday card

I love making cards and usually they are flowery and frilly and pretty. It's like my inner girl comes out when I am in a card making mood. But sometimes I am forced to approach cards in a different way. A close friend of Lucas' recently celebrated his birthday, and of course I was expected to make him a card. The usual masculine motifs of hunting, fishing or cars wouldn't do - he doesn't hunt or fish , neither is he crazy about cars, and he would probably think I was weird if I gave him a card like that. So I pulled some masculine colours out of my stash and came up with this.

Granted there is a flower like shape on there but Olivier loved it! The stamped I used on the tag was hand carved by Lucas, I thought that was a nice touch :)

Saturday 23 February 2008

Results!!

Here are the fruits of my labour from my unplugged day. I got off to a late start. I think the thought of not being able to check e-mail with my coffee kept me lingering in bed! I was also sorta disoriented and not sure where to start so I did did faff about a bit. But once I got going things went swimmingly!

A layout for the Overlooked challenge


More cases for Moo cards


Trying out perfect binding ideas. Collage sheets and stamps are all by Alpha Stamps


A gardening apron. This one I started on Friday and finished today. The ticking, collage fabric and ribbons are from Alpha Stamps. I'll try to get a better photo of it outside tomorrow.


Mind you it wasn't easy, I was constantly drawn to the computer, like a magnet. But once the day was over and I did check in I realised it was all worth it since my fears of missing out were not realised! Everything was still there, waiting for me. I'm hoping that this will help me to be more focuded in the weeks ahead. And I am considering making it a weekly thing. One day, unplugged from it all, to focus, create and recharge.

Thursday 21 February 2008

Disconnected

A few days ago Rebecca Sower threw out a challenge: spend a day unplugged - no TV, no telephone no internet. I've been struggling lately with lack of focus and being way too distracted by things like TV and Internet so I am taking the plunge and going unplugged tomorrow. I've made a nice list of some projects I want to tackle, so hopefully I won't feel the pull to check my e-mail every five minutes, or check in on numerous message boards to "see what's happening". I know I will definitely miss my flickr fix, I have become so addicted to that place, but a break might be just what I need!

I'm leaving you with a canvas I did yesterday for the Ranger Yahoo group. It uses Perfect Pearls for the background and I did an emboss resist technique with the butterfly stamps (the stamps and the fabric butterfly are both from Alpha Stamps)


Wish me luck and I'll be back over the weekend!

Monday 18 February 2008

Quick Monday post

Just a little update on my recent projects. Make a thing a day is going pretty well, though some days I have to do two projects to catch up because I spent the previous day out with friends or taking photos, or lets be honest, just being lazy!

This layout was done for the French blog ScrapNScrap and uses a sketch by Begga Huna


Along with the treat I made for Lucas I also made these cupcakes on Valentine's Day


This little felt clutch was made to hold my Moo calling cards.

Moo clutch

And I did this series of mugs based on an idea by Ashley Wren


I'm really enjoying exploring all the different parts of my creativity this month!

Thursday 14 February 2008

Sweets for my Sweet

I made this treat for my honey today.

I've had the idea for it ever since I got the box back in January, so I was excited to finally get it done! I started out with bread sticks, chocolate and sprinkles.
I melted the chocolate, dipped the sticks in, and then rolled them in the sprinkles.
While waiting for them to dry I decorated the box.

I measured each side or section of the box and cut the paper to suit. Then I sanded the edges of the box. I inked the sanded edges as well as the edges of the patterned paper, then covered the box. Finally I added the ribbon and hanging detail.


Supplies Used:
Empty Secret Keeper Box and chipboard phrase by Urban Lily
Papers by Basic Grey
Ink by Stampin Up!
Grungeboard key by Tim Holtz
misc ribbon and charms

Happy Valentine's Day!!

Tuesday 12 February 2008

Tuesday To-Do

Single Signature Stitched Notebook

project notebook

This book is based on instructions from Creating Handmade Books by Alisa Golden

Supplies

Two pieces of patterned paper 7&1/2"x 12" for cover (or you can use one piece of double sided patterned paper)
8 to 10 sheets of lined or graph notebook paper for inside pages 7"x 11.5"
String or twine
Large needle
Paper piercer

Instructions

Stick the two pieces of patterned paper together, (blank sides together), and fold in half to form cover

inside cover
outside cover


Fold inside pages in half and nest together


Then nest pages inside of cover


Open out and use one or two clips to clip everything together to keep pages and cover properly lined up for the next step


With inside pages facing up, mark dots in the middle of the fold and 2" above and below middle


Use paper piercer to pierce holes as marked through pages and cover


Thread large needle with string and start the stitch from the outside, in center hole leaving a few inches of string hanging on the outside


On inside pass thread through top hole to outside


Then from outside through lower hole, skipping the middle hole


Then finally through the middle hole to the outside


Tie ends of string in a knot, tying around the long stitch on the outside

Now you can embellish the front and start filling the pages!

Monday 11 February 2008

Lazy Weekend

I was still battling the cold over the weekend which really stumped my creativity. On Saturday I considered and rejected various projects and ending up playing with my camera instead. Lucas brought me a lovely bunch of daffodils on Friday, he knows that they always cheer me up. So I played with aperture and depth of field and lighting using the bouquet as my subject.
On Friday and Sunday I did manage to create a bit, playing with some journal ideas. The smaller one I made entirely using the PVA glue perfect binding method (maybe a topic for a future Tuesday To-Do?). The larger one was a ready made journal with a blank cover which I embellished with stamps and stickers.


I hope your weekend was more crafty than mine!

Thursday 7 February 2008

Four to Seven


My thing a day for the last few days. I actually managed two things yesterday. The notebook is going to be used to keep track on my projects this month. The instructions on how to make it will be next week's Tuesday To-Do. It's a single signature stitched book that you can make in less than half-hour.

Wednesday 6 February 2008

Tuesday To-Do (on a Wednesday)

I've been under the weather the last few days (and so has hubby) so blogging fell by the way side. Here are the instructions to make this card which I posted last week


Supplies

Ranger

Tim Holtz Alcohol Inks and Metallic Mixers

* Cranberry

* Raisin

* Red Pepper

* Gold

* Bronze

Alcohol Ink Applicator

Tim Holtz Distress Inks

· Fired Brick

· Tattered Rose

Black archival ink

Clear Emboss It ink pad

Clear UTEE

Cut & Dry Foam

Other

Glossy paper

Red card form (or red cardstock measuring 8&12 x 5&1/2)

White and black cardstock

Medium or large love themed rubber stamp

Four small love themed image stamps

Sentiment stamp

2” Square punch

Felt heart accent

Instructions

1. Alcohol Ink background

Cut a piece of glossy paper about 8&1/2 x 5&1/2 in size

Load up your alcohol ink applicator with the three inks and the mixatives


Using a dabbing motion apply to glossy paper, twisting the applicator as you go. Make sure to cover at least 2/3 of the paper


Ink up the medium/large stamp with black archival ink and stamp over background


Cut a piece measuring 4&1/8 x 5&3/8 and set aside

2. Cracked Tiles

Using small pieces of Cut & Dry Foam apply Tattered Rose and Fired Brick inks to a piece of white cardstock

Stamp four small images and use punch to punch out the squares


Press the embossing pad onto the squares, covering completely with the ink. Cover with clear UTEE and heat to melt; adding more UTEE until you have 3-4 layers. Set aside to cool


Once cool, bend the pieces back in forth in different directions forming cracks in the UTEE

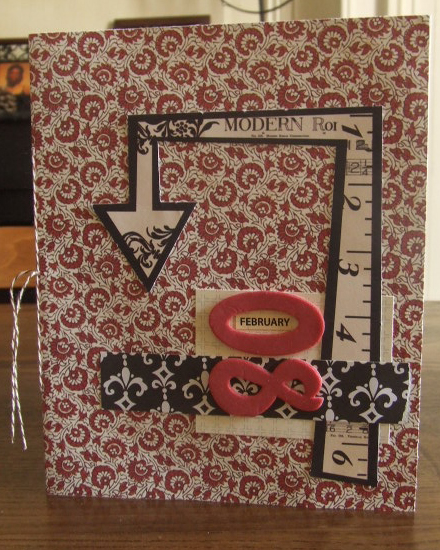
Stamp sentiment on a scrap piece of inked up white cardstock with Fired Brick ink. Assemble card as shown above.


card detail