When I started this blog last year it was because I felt I needed to separate my scrapbook stuff, from my real life stuff on my original blog. This was mostly because when I started blogging it wasn't about scrapbooking, but about my life in France. Almost a year later I have realised that scrapping and crafting are an integral part of my real life, the two cannot be separated. So I have started afresh, sorta, with Typepad. Please find my new updated blog here
http://francineclouden.typepad.com/callaloo_soup
All content from this blog has been imported over and you can read just the scrapbooking related posts by selecting the Scrapbooking and Paper Crafts Category.
Thank you all for being faithful readers of this little spot. I hope that you will join me over there and update your links and feed readers. The new blog will be a combination of all my interests, so you will also get a peek into other parts of my life!
Monday 23 June 2008
Friday 20 June 2008
Cosmo Cricket Showcase
Cosmo Cricket is having a Design Team Call and I am throwing my hat in the ring! I consider myself a late comer to their products; before the last few months I'd only used their papers once before: on this layout (which was published in 601 Great Scrapbooking Ideas by F&W Books),

and then I used the scraps to make this birthday tag for a friend.
 (The papers are from the Wanted Line)
But this year, I have fallen in love with the recent products. I got papers, rub-ons and diecuts from the Cogsmo line in my May DT kit from A Walk Down Memory Lane. I confess these were difficult papers to work with at first because they really scream BOY! Since we don't have kids (yet, according to dh Lucas) , he's the only boy around here so I started with that
 But the cogwheel papers made me think of that saying about seeing the wheels in one's head turning, and led to this page about how much I am a thinker and usually lost in my own world


I used some scraps to make this card, the sentiment was cut off from the throw away strip!

I love the circuit board patterned paper as well, and it was perfect for a page about a spam email I got that promised me $500,000. I love to document things like this, they will be fun to look back on! I also used the Tank Diecuts and some blackboard chipboard on this page. Not only am I a confirmed chipboard lover, but I love using raw chipboard, so this stuff is perfect for me!
The Get Happy line plus the blackboard chipboard (which is to die for!) were part of the April kit from Scrapbook Takeout and I so loved the bright funky colours! I used the papers in this minibook about the three kittens we had last year. They've now gone off to new homes (happily) and this album helps us remember how cute they were!


I'm in the middle of working on another minibook using one of the Ruby blackboard chipboard book and the Get Happy line, so be sure to check back soon!
I've really enjoyed working with these products lately, they are a pleasure!

and then I used the scraps to make this birthday tag for a friend.
 (The papers are from the Wanted Line)
But this year, I have fallen in love with the recent products. I got papers, rub-ons and diecuts from the Cogsmo line in my May DT kit from A Walk Down Memory Lane. I confess these were difficult papers to work with at first because they really scream BOY! Since we don't have kids (yet, according to dh Lucas) , he's the only boy around here so I started with that
 But the cogwheel papers made me think of that saying about seeing the wheels in one's head turning, and led to this page about how much I am a thinker and usually lost in my own world


I used some scraps to make this card, the sentiment was cut off from the throw away strip!

I love the circuit board patterned paper as well, and it was perfect for a page about a spam email I got that promised me $500,000. I love to document things like this, they will be fun to look back on!
 I also used the Tank Diecuts and some blackboard chipboard on this page. Not only am I a confirmed chipboard lover, but I love using raw chipboard, so this stuff is perfect for me!
The Get Happy line plus the blackboard chipboard (which is to die for!) were part of the April kit from Scrapbook Takeout and I so loved the bright funky colours! I used the papers in this minibook about the three kittens we had last year. They've now gone off to new homes (happily) and this album helps us remember how cute they were!


I'm in the middle of working on another minibook using one of the Ruby blackboard chipboard book and the Get Happy line, so be sure to check back soon!
I've really enjoyed working with these products lately, they are a pleasure!
Wednesday 18 June 2008
This Week's To-Do
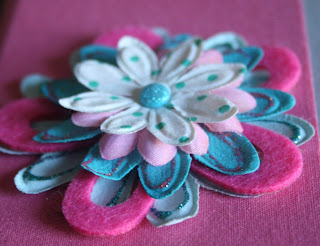
Tuesday came and went in a blur, so it's a Wednesday To-Do this week! I thought it would be fun to make some layered flowers, I am seeing these pop up all over the place! They are really quick to put together and have a lot of impact!
You will need:
Assorted flower embellishments in various sizes: paper, felt, silk etc.
3D adhesive: pop dots, double sided foam tape etc.
Stickles or glitter glue (optional)
Brads or buttons
Apply stickles or glitter glue to those flowers you want to decorate a bit more
 Starting with a large flower layer another kind on top.
 Use a 3D dot to add the next level
 Keep adding layers until you're happy with the way it looks. Use flowers that are smaller and smaller in diameter as you build.
 Finish off with a brad or button center

I think there are infinite variations you can use to build these blooms.

Don't forget to show me your version for a chance at a RAK. You have till next Tuesday night to link it up. Double points if you show me a project you used it on!

You will need:
Assorted flower embellishments in various sizes: paper, felt, silk etc.
3D adhesive: pop dots, double sided foam tape etc.
Stickles or glitter glue (optional)
Brads or buttons
Apply stickles or glitter glue to those flowers you want to decorate a bit more
 Starting with a large flower layer another kind on top.
 Use a 3D dot to add the next level
 Keep adding layers until you're happy with the way it looks. Use flowers that are smaller and smaller in diameter as you build.
 Finish off with a brad or button center
I think there are infinite variations you can use to build these blooms.

Don't forget to show me your version for a chance at a RAK. You have till next Tuesday night to link it up. Double points if you show me a project you used it on!
Tuesday 17 June 2008
It's not too late
To sign up for the Make Me A Super Scrapper Contest at The Scrapbook Site. The first challenge is already posted and you have until the deadline on Saturday to enter! We have great prize packages as well as the chance to win a Guest DT spot! Go check it out!
Sunday 15 June 2008
It just takes a little focus
The last few days went by in a blur. Between DT commitments and the contest at My Scrapbook Nook, I've had to keep my head down! But what I've learned is that if I focus (and stay off the computer) I can accomplish a lot. I made these three projects yesterday. They are all variations on the theme "Found"


With my lesson learned in mind I am planning the week ahead. My hope is to try a new craft over the next seven days. Most likely sewing.


With my lesson learned in mind I am planning the week ahead. My hope is to try a new craft over the next seven days. Most likely sewing.
Thursday 12 June 2008
Sneaky peeky!
Just a tease of a couple new items uploaded to my etsy store. This MATADFAM is really helping the creativity flow!!

Get the full picture here and here.

Get the full picture here and here.
Wednesday 11 June 2008
Latest MATADFAM
I've been creating but not finding time to post. So far I am keeping up, and it feels good!


Challenges at My Scrapbook Nook

DT work for A Walk Down Memory Lane with the June Kit

My attempt at a ribbon flower. I think I might need to work on this some more!


Challenges at My Scrapbook Nook

DT work for A Walk Down Memory Lane with the June Kit

My attempt at a ribbon flower. I think I might need to work on this some more!
Tuesday 10 June 2008
Tuesday To-Do : Important Numbers
This is an older tutorial that I developed for Self-Addressed last year and uses an invitation size card. If you don't have a ready made card blank, you can make one by cutting a letter sized piece of cardstock in half widthwise.


Supplies
1 blank card
Patterned papers (these are American Crafts)
1 6x6 sheet of matching cardstock
Felt flowers
Alphabet rub-ons
Alphabet rubber stamps
Piece of black cardstock
Notebook paper
Stamping ink
2-piece metal file fastener
Anywhere hole punch and regular hole punch
Sewing machine (optional)
- Cut 13 pieces of notebook paper measuring 4”x 5&1/4”
- Stamp the letters A B on the top right corner of one sheet, B C on the next and so on until you reach the end of the alphabet

- Cut a piece of cardstock 4&1/8 ” x 5&3/8” and a piece of patterned paper 4” x 5&1/4”.
- Stick the patterned paper to the card stock and then stitch around all four sides (you can also use rub-on, stamped or faux stitching)
- Cut out a flower motif from a second piece of patterned paper, ink the edges, and adhere to stitched piece
- Cut a third piece of patterned paper (preferably in a lighter shade) measuring 1&1/2”x2” and a piece of black cardstock 1&5/8”x2&1/8”.
- Mat the patterned paper with the cardstock and stitch around the sides (you can also use rub-on, stamped or faux stitching)
- Use the rub-ons to spell out “important numbers” on this smaller piece
- Stick to top right corner of larger piece
- Adhere entire piece to front of card
- Decorate the lower left corner with felt flowers and brad.
- Use the fastener as a template to mark two holes on the inside back cover of the card. Punch holes with anywhere punch
- Mark and punch matching holes into the notebook sheets
- Use fastener to bind pages into the card.
 The advantage of this kind of fastener is that it is easy to add more pages in later if you need them!


If you make your own version of this make sure to link me up in the comments by next Monday at midnight to be entered into the goodie draw.
Saturday 7 June 2008
Seeing Red 2
Another photo I took for the seeing red challenge. I love cherries, don't you? They are the perfect fruit for this time of year: juicy, sweet and refreshing.

I used the same background (Rouge de Garance Scrapbook paper), and played a bit in Photoshop, adding more contrast and colour and also textures.

I used the same background (Rouge de Garance Scrapbook paper), and played a bit in Photoshop, adding more contrast and colour and also textures.
Friday 6 June 2008
Contest at The Scrapbook Site!!!
MAKE ME A SUPER SCRAPPER contest at A Walk Down Memory Lane and The Scrapbook Site
You will be challenged during a 6 week contest at A Walk Down Memory Lane. The grand prize? A Guest Design team spot on our awesome Design team OR a prize package valued at over $100. The 2nd place winner will receive a prize package valued at $50. The 3rd place winner will receive a prize package valued at $25.
In your quest to become a Super Scrapper, we will challenge you each week to show off your best work, using a specific manufacturer's products. You may receive additional instructions such as using a sketch, using a layout recipe, or even scraplifting a layout.
Each week, your layout will be voted on by our message board members. Each vote gains you valuable points. This, along with votes from the Design Team will add up to your final score at the end of the contest. The one with the highest point total will be declared our Super Scrapper of the year!
Requirements:
** You need to be a registered member at the message board located at www.TheScrapbookSite.com
** In order to vote, you must be a registered member at the message board.
** You will find a list of rules and manufacturers to be used at the message board in the contest section.
** If chosen as the Super Scrapper, you will need to sign our DT contract if you choose that prize.
** International designers are welcome to apply, however if chosen, you agree to pay any additional shipping charges of your DT products.
Details:
** The contest will start on Sunday, June 15 and run for 6 weeks.
** We will kick off our contest with an online crop on Saturday, June 14 with challenges, classes and more!
** Points will be given for votes from the message board members, Design Team, and you will even receive points for your participation on the board, layouts uploaded to our gallery, and dollars spent at our store.
You can get more information here
If you have any questions about the contest, please contact lisa@awalkdownmemorylane.net
MATADFAM Days 5 & 6
Here's a layout I made yesterday for another challenge at My Scrapbook Nook
 and a sneak peek of another layout for the ScrapDreamie Blog.

You can see the entire thing here
 and a sneak peek of another layout for the ScrapDreamie Blog.
You can see the entire thing here
Thursday 5 June 2008
Seeing Red

A few days ago I found out about Sara's Seeing Red challenge by way of Artsy Mama. Yesterday while rushing to get out of the house I pulled this ribbon from my purse and it landed next to this lovely blue Rouge de Garance paper. A sign if ever I needed one.
Wednesday 4 June 2008
Bambino!!!
This month I am working with the Bambino line from Daisy D's for ScrapGenie. Here's a little sneak peek of my project which was posted today on the Scrap Dreamie Blog. You can see the entire project there.

And yes, those count for MATADFAM. I actually finished them up yesterday. Did you create today? Don't forget to link me up!

And yes, those count for MATADFAM. I actually finished them up yesterday. Did you create today? Don't forget to link me up!
Tuesday 3 June 2008
Tuesday To-Do : White Space
My MATADFAM for today is a layout that will serve as the Tuesday To-Do. A layout with white space. I actually did this for a challenge on My Scrapbook Nook, and thought it would be fun to explain how I made it. I don't have step by step photos, so I hope my explanations will be clear.
White space is also known as negative space, and is that part of a layout that isn't "filled up" with elements. It doesn't need to be white, just empty, but I chose to use white card stock for my background. White space is an effective design element because it allows the eyes to rest, and also helps to emphasize the elements that are there, thus pulling the viewer in.

You will need:
1 photo
12x12 Card stock
Patterned paper
felt or other trim
acrylic paint in two colours
journaling stamp
Phrase stamp
decorative stamp
circle label
letter stickers (small and large)
decorative border punch or scissors
Bubble wrap
1. Paint a roughly square shape in the center of the card stock. This doesn't have to be precise, simple swipe the brush several times across the card stock
2. Brush some of the second colour of paint across a piece of bubble wrap and press into the top left and bottom right corners of the painted square
3. Stick photo approximately in center of painted area
4. Cut a strip of patterned paper about 1.5" wide by 7" long and tear a bit off each end. Use the punch or scissors to make a border along one long side. Add to left, slightly on top of photo
5. Stamp journaling spot to bottom left of photo, slightly on top of the paper strip
6. Add felt trim and circle label as shown
7. Add title with letter stickers
8. Stamp phrase stamp below title, overlapping journaling spot
9. Use decorative stamp to make a photo corner above the top right edge of photo
10. Add journaling and voila!
Don't forget to show me your version of this by next Monday midnight, to be entered into a draw for a goodie! Also link me up with whatever you created today!
Eclectica
I'm so excited! June kicks off the Summer of Favorites series on Scrapbook Takeout and the kit I designed for June is now live! I had a wonderful time selecting some of my favourite items for the Works and Preserves kits, as well as for the Paper Add-on and exclusive rubber stamps. Some of the items are brand new and others are oldies but goodies. The kit is called Eclectica to mirror my totally randiom scrapbooking style!
The unmounted rubber stamps are also available as a separate purchase
 Visit the website for more details as all the contents of the kit aren't pictured here.
I am hoping we will make this a regular thing because my original list of items was very long, and I have enough fodder for another kit or two!


The unmounted rubber stamps are also available as a separate purchase
Visit the website for more details as all the contents of the kit aren't pictured here.I am hoping we will make this a regular thing because my original list of items was very long, and I have enough fodder for another kit or two!
Monday 2 June 2008
MATADFAM Day 2
Another scrapbook page. This time for the Scrapjacked Challenge

What did you create today? Don't forget to link me up!

What did you create today? Don't forget to link me up!
While I was out
I did manage to get some pages done while I was traveling. Only three, and a card, which totally do not justify the amount of crap I lugged with me, but a girl has to have a choice right?
Exhibit A - for HMITM #80

Exhibit B - Scraplift Challenge

Exhibit C - Sister Scrap

Exhibit D - Birthday card for Sarah

Exhibit A - for HMITM #80

Exhibit B - Scraplift Challenge

Exhibit C - Sister Scrap

Exhibit D - Birthday card for Sarah

Sunday 1 June 2008
MATADFAM Day 1
And we're off! It took me the entire day to get over my inertia, but I did it! Today's project is my page for the latest HMITM Challenge.

What did you start off the month with? Link me up by midnight PST to be entered in the draw.
And if you're looking for some more Make Something Everyday fun, check out the month long challenge at Scrapbook Takeout on the forum. You could win a Purple Cows paper trimmer!

What did you start off the month with? Link me up by midnight PST to be entered in the draw.
And if you're looking for some more Make Something Everyday fun, check out the month long challenge at Scrapbook Takeout on the forum. You could win a Purple Cows paper trimmer!
Subscribe to:
Posts (Atom)